Ultrasonic Range Issues

hi all!

I have a few issues in regards to the Ultrasonic Range Finder that I would like to share here:

So first - the servo’s 90 degree and -90 degree will cause the Ultrasonic board to hit the LCD display. In order to fix that I had to limit the movement to: 80 degrees up to -85 degrees. I guess that the exact degrees are different from one Sparki to the other and specific calibration is required. Did anyone had the same issue and how did you fix that?

Second Issue - Range Values: There is an issue with Range Values on the right side. So - when turning the Ultrasonic Range Finder to the Right, the range value is always 6 to 8 cm… even in open space with no walls nearby. On the left angles - the range finding works like a charm. So in order to work around this - I had to limit the right hand angles even further: max right angle is 60 degrees…

So the Ultrasonic Range Finder works fine between -85 degrees up to 60 degrees.

Anyone having similar issues - and if so, can you please share how you solved it?

Thanks!!

What’s the position of of thr RANGE_FINDER head at “0” degrees or SERVO_CENTER? Is it straight ahead or off center?

It is straight - I don’t have a calibration problem. I read that others are having calibration problems - that’s not the issue here. If the servo is rotating to an angle larger than 60 degrees (right angle), the Range Values are completely screwed up (showing 6 cm always…).

Any clue?

The servo position does make the sensor head hit the LCD at full left and right positions on my Sparki, but I don’t have the range problem you describe.

This is a sketch I wrote that displays the range detected using both static positions and degrees. I used the sparki.ping function for this; what function are you using that returns the incorrect value?

[code]/*******************************************
Servo and Ultrasonic Rangefinder Test
by 8-Bits Updated: 20140223

Move the servo using position functions (left, center, right)
and degrees (-90, 0, +90).

Record the distance value (cm) detected at each of the positions
and display the results on the LCD.
********************************************/
#include <Sparki.h> // include the sparki library

void setup()
{
sparki.servo(SERVO_CENTER); // center the servo
}

int cm = 0;

void loop()
{
sparki.servo(SERVO_LEFT); // position servo left using function
cm = sparki.ping(); // detect the distance of object
if(cm != -1) { // test for valid response
sparki.clearLCD();
sparki.print(“Funct Left: “);
sparki.print(cm);
sparki.println(” cm”);
sparki.updateLCD(); // display test results
delay(5000); }

sparki.servo(SERVO_CENTER); // position servo center using function
cm = sparki.ping(); // detect the distance of object
if(cm != -1) { // test for valid response
sparki.clearLCD();
sparki.print(“Funct Center: “);
sparki.print(cm);
sparki.println(” cm”);
sparki.updateLCD(); // display test results
delay(5000); }

sparki.servo(SERVO_RIGHT); // position servo right using function
cm = sparki.ping(); // detect the distance of object
if(cm != -1) { // test for valid response
sparki.clearLCD();
sparki.print(“Funct Right: “);
sparki.print(cm);
sparki.println(” cm”);
sparki.updateLCD(); // display test results
delay(5000); }

sparki.servo(-90); // set servo to -90 degree position (left)
cm = sparki.ping(); // detect the distance of object
if(cm != -1) { // test for valid response
sparki.clearLCD();
sparki.print(“Posit -90: “);
sparki.print(cm);
sparki.println(” cm”);
sparki.updateLCD(); // display test results
delay(5000); }

sparki.servo(0); // set servo to 0 degree position (forward)
cm = sparki.ping(); // detect the distance of object
if(cm != -1) { // test for valid response
sparki.clearLCD();
sparki.print(“Posit 0: “);
sparki.print(cm);
sparki.println(” cm”);
sparki.updateLCD(); // display test results
delay(5000); }

sparki.servo(90); // set servo to +90 degree position (right)
cm = sparki.ping(); // detect the distance of object
if(cm != -1) { // test for valid response
sparki.clearLCD();
sparki.print(“Posit +90: “);
sparki.print(cm);
sparki.println(” cm”);
sparki.updateLCD(); // display test results
delay(5000); }

delay(1000);
} [/code]

First Issue: I agree with the findings that the RANGE_FINDER head is does limit go the -90 or 90 degree angles when commanded. it seems that the servo motor does not stop at these position and tries to go further. I do not know why it does not bound itself at -90 or 90 degrees yet.

Second Issue: How are you measuring the distance? Is it measured in open space? Remember that this is a sonar type measurement and requires an object to bounce back the signal. In open space, the measurement could be anything or erratic. I used “8-bits” servo test above to measure two objects (in this case square boxes), one on the right and one on the left. With a ruler I placed the objects 20 cm from the edge of the ranger finder “eyes” when the servo is commanded at -90 and at 90 degrees. My Sparki measures 20 cm +/- 1 cm, whether it reading at -90 (SERVO_LEFT) position or 90 (SERVO_RIGHT) degree position. I think unit and the programming is measuring correctly it this respect.

Again, do not rely on the measurement if there is no object or the object is too far for the sonar to reflect back into the RANGE_FIDER “eyes”. I do not know how far a distance can the eyes “see” reliably yet. That will be for another experiment. But I can say that my Sparki can see 20 cm away with +/- 1cm tolerance.

Sorry for replying jut now.

The measurements are done in a controlled environment - the only “wall” near sparki is a big square book. On the left side I can record a very reliable range - moving the book closer or farther will cause the reading to respond as expected.

On the right side on the other hand using the same book and testing at different distances will not produce reliable readings for angles larger than 60 degrees. The Ping operation always returns 6cm even though the wall is at 20 cm. moving the wall closer at 2-3 cm will still produce constant 6cm. Very frustrating…

Can anyone confirm similar issues ? Any suggestion how to fix that?

Thanks!

[quote=“bitboy”]Can anyone confirm similar issues ? Any suggestion how to fix that?
[/quote]
Are you seeing the same problem when you run the sketch I posted above?

According to the Sparki.cpp, the positions are defined as follows:

#define SERVO_LEFT -90
#define SERVO_CENTER 0
#define SERVO_RIGHT 90

This is obviously just the code. Depends on the physical setting on the servo.

This error is very strange. That fact that it works sometimes means the part isn’t broken, and the two units shouldn’t ever conflict, code or otherwise. The only way they’re still connected is by the same power supply.

Lets try a few things:
1 - Is there any chance its seeing some part of Sparki? Can you try lifting the ultrasonic up? I don’t think this is the case, as there’s more sticking out on the working left side, but who knows.
2 - Is the head hitting the lcd when its on the left side? Maybe that’s causing the motor to stall and some weird power things are happening as a result.
3 - Try turning off the power switch, with Sparki plugged in to the USB so its still powered. Manually move it to the right. Does it still give weird readings?

guys,

I think I solved the problem. This is very important for others who might experience similar issues with the range finder.

bottom line - there must be an issue with the mechanical design that causes the UltraSonic sensor board to be placed too close to the Sparki body. As a result, the robot’s body reflects back the sonar waves and causes the readings to show invalid numbers at some angles.

How to solve [ANY ADVICE IS TAKEN AT YOUR OWN RISK!! - DOING SO MIGHT BREAK YOUR SPARKI !!! - I"M NOT A PRO!!!]:
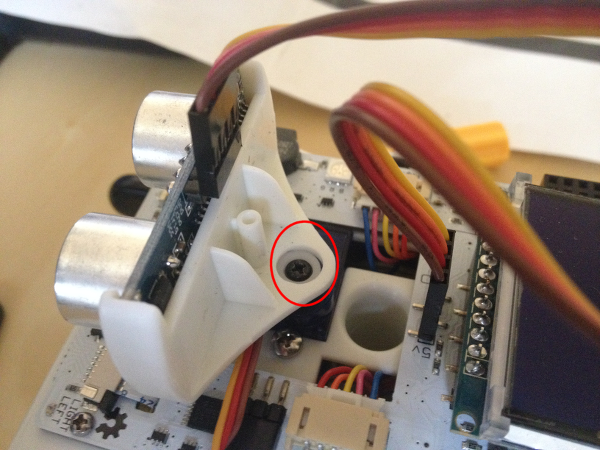
First, you need to unscrew the board - red circle in the below image:


Once unscrewed you want to pull up the UltraSonic board holder (the white part) just a bit . I completely detached it and did some tests - confirming that indeed when placed a bit higher fixes the readings very nicely.
Once the board is placed a bit higher screw back. Readings should be much better now!!

I’m pasting here a test program based on 8-Bits’ code. It uses the remote control and performs Sonar Readings on constant intervals.

/*******************************************
 Servo and Ultrasonic Rangefinder Test
 by bitboy - 20140226 Modification of original code from 8-Bits
 by 8-Bits   Updated: 20140223
 

 Move the servo using remote control (left, center, right) 
 
 Periodically performs range finding and display the results on the LCD.
********************************************/
#include <Sparki.h> // include the sparki library

#include "Timer.h"

Timer t;

//use which ever angles fits your Sparki in order to avoid hiting the LCD display
int FIX_SERVO_LEFT = -85;
int FIX_SERVO_RIGHT = 80;
int FIX_SERVO_CENTER = 0;

int PING_INTERVAL = 100;  //wait time between sonar readings (in milliseconds)

char* LABELS[3] = {"LEFT : ","CENTER : ", "RIGHT : "};

int rangeSide;  //rangefinder state variable - can hold any of - 0:Left Angle 1:Center Angle 2:Right Angle

void setup()
{ 
    sparki.servo(FIX_SERVO_CENTER);          // center the servo
    rangeSide = 1;  //initial state of range finder is center angle
    t.every(PING_INTERVAL, doMeasure);  //perform range finding on PING_INTERVALS and print reasult to LCD
} 


void loop() 
{ 
  
  int code = sparki.readIR();  //Use remote control to change Sonar Direction
  
  switch(code){
      case 12: //Remote key "1" - Perform Left Test
                sparki.servo(FIX_SERVO_LEFT);
                rangeSide = 0;
                break;
                
      case 24: //Remote key "2" - Perform Center Test
                sparki.servo(FIX_SERVO_CENTER);
                rangeSide = 1;
                break;
                
      case 94: //Remote key "3" - Perform Right Test
                sparki.servo(FIX_SERVO_RIGHT);
                rangeSide = 2;
                break;
  }
  
  t.update();
  
}

void doMeasure(){
  sparki.clearLCD();
  sparki.print(LABELS[rangeSide]); 
  sparki.print(sparki.ping());                
  sparki.println(" cm");
  sparki.updateLCD();
}

Good job…I forgot about that. When I first got my Sparki, I took it apart to give it a paint job. I made sure that the RANGE_FINDER head is dead on straight at SERVO_CENTER position and that it is not tilted forward nor slouching LEFT or RIGHT. That’s why I never had the issue with the RANGE_FINDER.

Those who are making this adjustment, make sure that you do not overtighten the screw or else the RANGE_FINDER head will either tilt forward or slouch left or right.

Thanks for sharing the code above, I’ll implement the timer routine for interval measurements.

FYI, here is some code that people can use in the future to test the ultrasonic. It doesn’t use any Sparki library code at all, so it will make sure no other parts are interfering. Once its uploaded, you should be able to see the output in the serial port monitor (the little icon in the upper-right hand corner of SparkiDuino).

#define ULTRASONIC_ECHO 5 // PC6 
#define ULTRASONIC_TRIG 10 // PB6

void setup() { 
Serial.begin (9600); 
pinMode(ULTRASONIC_TRIG, OUTPUT); 
pinMode(ULTRASONIC_ECHO, INPUT); 
}

void loop() { 
int duration, cm; 
digitalWrite(ULTRASONIC_TRIG, LOW); 
delayMicroseconds(2); 
digitalWrite(ULTRASONIC_TRIG, HIGH); 
delayMicroseconds(10); 
digitalWrite(ULTRASONIC_TRIG, LOW); 
duration = pulseIn(ULTRASONIC_ECHO, HIGH); 
cm = duration / 29 / 2;

Serial.print(cm); 
Serial.println(" cm"); 
delay(100); 
}

hi,

I tried your code - and even better, I detached the Ultrasonic Board and hooked it up to my Stand Alone Arduino Uno board.

The tests shows similar results - meaning that there must be an issue / flaw with the sensor board.

Proximity sensitivity is only active under 7 cm. If the wall is farther (15, 20, 30 cm) - the reading shows max 7cm.

Below 7 cm the proximity value is adjusted just as expected.

One note - when I touch the board (specifically the middle oblong component) the reading will suddenly show good range values.

This component is the oscillator and based on what you said above, either the component is poorly soldered unto the board or defective. I do not know ArcBotics policy on parts replacement but I’m sure they are willing to do so. Or search the net to find a replacement, board part number is HC-SR04.

Agreed, sounds like a bad oscillator circuit. We’ll have a replacement out on its way soon.

that’s great news - thank you ArcBotics!!